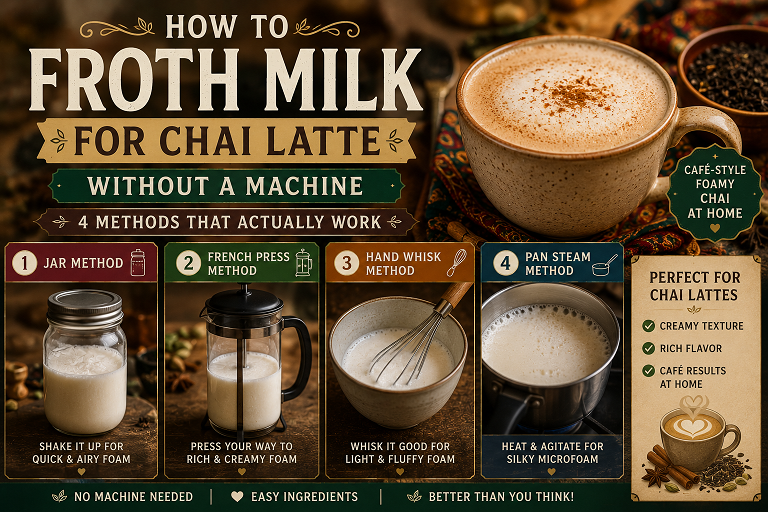
You can froth milk for a chai latte without an espresso machine using a kitchen whisk, a suitable French press, or a clean jar for cold milk. A handheld electric milk frother is another option if you want a small powered tool. The right choice depends on what you own and whether you want a warm, creamy latte or a cold foam topping.
For a hot drink, gently warm pasteurized milk to around 140–149°F (60–65°C), then aerate it in an open, heat-safe vessel. For the jar method, use refrigerated milk and serve the foam cold. Do not shake hot milk in a sealed jar. You do not need to create a steam or pressure hazard to get a pleasant layer of foam.
This guide explains four approaches, the differences between milk types, how to keep the chai from tasting diluted, and what to change when your foam disappears. These are practical preparation instructions, not claims of a side-by-side laboratory or hands-on product test.
Which No-Espresso-Machine Method Should You Use?
If you mean no electrical frothing equipment at all, begin with the first three methods. A handheld frother is electrically powered, even though it is much smaller than an espresso machine. It deserves a separate label rather than being described as an equipment-free solution.
| Method | Use it for | What to expect | Main limitation |
|---|---|---|---|
| Kitchen whisk | A hot latte with tools already in the kitchen | A light, airy topping | More effort; bubbles may be relatively coarse |
| Suitable French press | Hot or cold milk when the manufacturer permits that use | A generous layer of foam | Milk must reach the screen; more parts to wash |
| Jar with cold milk | A simple iced-chai topping | Loose, bubbly cold foam | Not a hot-milk method and not fine latte-art foam |
| Handheld electric frother | Frequent single-cup preparation | Adjustable aeration with less manual effort | Does not normally heat milk; requires power or batteries |
There is no universal winner. A whisk may be sufficient if you make a latte occasionally. A press may be convenient if it is already part of your kitchen. Buying a new tool makes sense only when it solves a recurring problem such as hand fatigue, slow preparation, or awkward pouring.
Frothed Milk Is Optional for Chai
Many South Asian milk-chai preparations simmer tea and milk together. They do not need a separate cap of frothed milk. Some serving techniques aerate the finished drink, but that is different from preparing a milk topping on its own.
A café-style chai latte often combines a strong chai base with separately warmed or foamed milk. Both approaches can taste good. Our masala chai explainer covers the terminology, while the stovetop masala chai recipe is the better starting point if you want tea and milk cooked together.
Foam also has different textures. Large bubbles create a light topping that sits above the drink. Very fine bubbles create a more integrated, glossy texture often called microfoam. Home tools can make enjoyable foam without consistently reproducing the texture of a practiced barista using a steam wand. More volume does not automatically mean a better latte.
Before You Begin: Milk, Temperature, and Vessel Size
Choose milk you actually enjoy drinking
Start with pasteurized dairy milk or a commercially prepared plant-based beverage stored according to its label. Whole milk gives a richer mouthfeel, while 2% milk is a useful middle ground. Skim milk can produce plenty of foam; it should not be dismissed as incapable of frothing simply because it contains less fat. Nespresso’s milk-frothing guide distinguishes the richer texture of whole milk from the lighter, more voluminous foam of lower-fat milk.
Plant-based results depend heavily on the specific formulation. An oat beverage designed for coffee may behave differently from a basic oat drink, even when both have similar packaging. Soy, almond, and other alternatives also vary. The word “barista” is a useful clue, not a guarantee that every brand will produce identical foam.
For example, Oatly describes its Barista Edition as suitable for foaming. That is a manufacturer’s product description, not evidence that it is the best choice for every reader. Check ingredients, allergens, flavor, pack size, and price before buying. Our oat-milk chai latte guide explains how to use a dairy-free base in the finished drink.
Use temperature as a guide, not a rigid rule
For these warm-milk methods, around 140–149°F (60–65°C) is a practical starting range. Use a food thermometer rather than touching hot equipment. This is a texture and serving-temperature suggestion for already pasteurized milk, not a home-pasteurization procedure. Follow the beverage label or equipment instructions if they specify a different range.
Cold milk can also foam, so it is incorrect to say that milk below 140°F cannot hold bubbles. The method and intended drink matter. For an iced latte, heating the milk first adds an unnecessary cooling step. For a hot latte, avoid boiling the milk: excess heat can introduce an unpleasant cooked taste and make handling harder.
Leave room for expansion
Use a stable container with plenty of empty space above the milk. For an open whisking vessel, start with milk occupying no more than about one-third to one-half of its usable volume. Equipment-specific minimum and maximum marks take precedence. A cup filled almost to the brim is unsuitable for frothing because the foam and moving liquid have nowhere to go.
For one latte, approximately 1/2 cup (120 mL) of milk is a useful practice quantity, but it must be deep enough for your chosen tool. A large press may need more. If a tool cannot reach a small amount properly, choose a smaller suitable vessel or a different method instead of forcing it.
Method 1: Froth Warm Milk with a Kitchen Whisk
This approach suits a first attempt because it needs only a saucepan, a whisk, and a stable work surface. It produces a pleasant airy topping, although it may not give the smoothest pouring texture.
- Warm the milk gently. Put the milk in a small saucepan over low to medium-low heat. Stir and check the temperature. Remove the pan from the heat around the range described above.
- Move to a stable surface. Place the pan on a heat-resistant mat. Hold its handle securely. Do not tilt a hot pan precariously to gather the milk.
- Whisk near the surface. Make quick, controlled strokes that pull air into the milk without splashing. A small balloon whisk is easier to control than an oversized one in a narrow pan.
- Check the texture. After about 30 seconds, look for an expanded, bubbly layer. Continue in short bursts if needed; the time depends on the milk and your movement.
- Serve promptly. Pour the milk into the prepared chai and spoon the remaining foam over the surface.
If the whisk barely contacts the milk, the pan is probably too wide for your portion. Transfer to a suitable heat-safe bowl with enough depth, or use more milk for two drinks. Do not increase the heat in an attempt to fix a tool-and-container mismatch.
Method 2: Use a Suitable French Press or Manual Milk Press
A plunger screen can move air through milk and create foam, but not every coffee press is designed for vigorous pumping. Check the manufacturer’s instructions. A purpose-built manual milk frother is an alternative when you want this action without repurposing a coffee brewer.
- Inspect and clean the press. Remove coffee grounds and oily residue. Do not use a chipped or cracked glass vessel, a loose handle, or a damaged screen.
- Add milk at the correct temperature. Use cold milk for cold foam or separately warmed milk for a hot drink, provided the equipment permits it. Avoid sudden temperature changes in glass.
- Respect the fill limit. Leave expansion room and ensure the milk reaches the screen’s working range. Do not assume every press works with the same small quantity.
- Use controlled strokes. Secure the lid as instructed and move the plunger gently up and down through the milk surface. Keep the vessel upright. Do not slam the screen against the bottom or force a resistant plunger.
- Stop when the texture suits you. Pause frequently to check volume. A rigid target of exactly 30 pumps is less useful than watching the milk.
- Pour and clean. Pour the liquid into the chai, add the foam, and wash the screen assembly before milk dries inside it.
Stop immediately if the plunger sticks or the vessel shifts. A large foamy mound is not worth spilling hot liquid. If the screen cannot move smoothly, switch to a whisk rather than applying more force.
Method 3: Shake Cold Milk in a Jar for Iced Chai
The jar method is a simple way to make a loose cold topping. It is not an alternative steam wand, and the bubbles may settle relatively quickly. Prepare the iced chai before shaking so you can use the foam immediately.
- Choose a clean, intact food-safe jar. It needs a secure lid and enough room for expansion. Do not use a damaged jar or a container that leaks.
- Add refrigerated milk. Fill the jar no more than halfway; a smaller fill leaves more room for the milk to move.
- Close and shake. Hold the jar securely and shake for about 20–30 seconds. Pause and inspect it. Repeat briefly if more foam is forming.
- Open upright. Set the jar down, allow the liquid to settle briefly, and remove the lid.
- Top the drink. Pour or spoon the cold milk and foam onto chilled chai and ice. Drink promptly for the best texture.
Keep this method cold. Do not fill a jar with hot milk, seal it, and shake it. Do not heat a sealed jar in a microwave. This guide does not require microwaving the jar at any stage; use an open-vessel method when you want warm frothed milk.

Our iced brown sugar chai latte recipe provides a drink base for this variation. Remember to reserve some of the recipe’s milk for the topping rather than adding an extra full portion and weakening the chai.
Method 4: Use a Handheld Electric Milk Frother
A battery-powered or rechargeable whisk is an optional convenience, not a requirement. Most simple handheld models aerate milk but do not heat it. Check your own model’s instructions for suitable liquids, fill depth, cleaning, and operating limits.
- Prepare the milk. Warm it separately for a hot latte or leave it refrigerated for cold foam.
- Choose a tall, stable vessel. Leave generous headroom and keep the milk deep enough to cover the coil.
- Submerge before switching on. Start with the whisk head below the surface to reduce splashing.
- Introduce air gradually. Move the head close enough to the surface to draw in air while keeping it in the liquid. Lower it slightly to circulate the foamy milk.
- Check after short bursts. Stop when you have a pourable foam rather than continuing until every available space fills with bubbles.
- Switch off before lifting out. Swirl the vessel gently and pour. Wash the whisk according to its instructions; keep the motor housing dry.
If milk sprays out, the coil is too exposed, the vessel is too full, or the speed is too high for the quantity. Switching off and adjusting the setup is more effective than trying to control the splash while it runs.
How to Add Frothed Milk Without Weakening the Chai
Finish the chai base before frothing. Foam is temporary, so making it first and then spending several minutes brewing tea gives it time to separate. Strain loose leaves and coarse spices, dissolve any sweetener in the chai, and have the mug ready.
For purchased concentrate, follow the label’s dilution ratio and measure the milk before frothing. Foam takes up extra space because it contains air; it does not represent extra liquid milk. A half-cup portion that expands still contributes roughly that original milk quantity to the drink.
If the base is already a finished milk chai, adding another large portion of milk may flatten its flavor. Either enjoy it as it is, add only a spoonful of foam, or prepare a stronger tea base intended for dilution. More spices alone will not correct a tea base that has become too watery.
Pour the liquid milk first, gently mixing it into the chai, and finish with the foam. For a thick cap, hold some foam back with a spoon. For a more integrated texture, gently swirl the milk before pouring. Avoid vigorously stirring the completed topping if you want it to remain visible.
For a seasonal version, use the same sequence with our pumpkin chai latte. Mix pumpkin and sweetener into the base, keeping the frothing portion plain. A light dusting of chai spice mix can finish the drink, but a thick layer of dry spice makes the surface gritty.
Why Your Milk Is Not Frothing: Common Problems
| Problem | Possible reason | What to try |
|---|---|---|
| Very little foam | Tool is not drawing in air, milk is too shallow, or formulation foams poorly | Adjust depth and vessel size; compare another milk while keeping the method unchanged |
| Huge bubbles | Too much surface agitation | Reduce aeration, circulate gently, then swirl before serving |
| Foam disappears quickly | Long wait, coarse bubbles, or unsuitable milk for the desired texture | Prepare the chai first; froth immediately before pouring |
| Milk tastes cooked | Too much heat or prolonged warming | Use lower heat, stir, and monitor with a thermometer |
| Chai tastes weak | Too much milk for the strength of the tea base | Measure before frothing and follow the concentrate’s dilution ratio |
| Plant milk separates | Heat, acidity, or formulation mismatch | Follow product guidance; try a beverage intended for hot drinks and avoid lemon in milk chai |
Change one variable at a time. If you simultaneously switch milk, temperature, cup, and whisking speed, you will not know which adjustment helped. Begin with a clean vessel, the same portion of milk, and one method. Once the basic result is consistent, adjust the texture to your taste.
Cleaning and Storing Milk Safely
Wash utensils with appropriate detergent and rinse thoroughly; simply swirling a frother in water is not a substitute for cleaning it. Take apart removable press screens as the manufacturer directs. Leave components to dry and never immerse an electrical handle unless its instructions explicitly allow it.
Measure only what you need and return the unused carton to the refrigerator promptly. Do not pour warmed or handled leftovers back into the original carton. Foam is best prepared fresh rather than stored as a topping for the next day.
The FDA’s food-storage guidance recommends keeping refrigerated foods at 40°F (4°C) or below and limiting time at room temperature to two hours, or one hour when the surrounding temperature exceeds 90°F (32°C). Follow the milk’s label as well. A pleasant smell does not prove that improperly stored milk is safe.
What Is Worth Buying for Occasional Home Lattes?
Start with the tools you already have. If you enjoy the drink and want to improve the routine, identify the missing function before buying: accurate heating, easier aeration, or better pouring. A thermometer helps with temperature; a handheld whisk reduces manual effort; a small pouring jug helps control the finish. They solve different problems.
For a handheld frother, compare how comfortably it switches on, whether the shaft is sturdy, how it is powered, and whether replacement parts or cleaning instructions are available. For a manual press, prioritize suitability for milk, safe handling, capacity, and easy disassembly. Do not compare only the advertised foam volume.
There is no guaranteed payback period. An occasional latte may not justify another appliance, while frequent use may make convenience worthwhile. Compare current prices and ongoing battery costs with your own habits instead of relying on a promise that a tool pays for itself after a fixed number of cups.
Frequently Asked Questions
Can I froth milk without a frother?
Yes. Whisk warm milk in a stable, open vessel, use a suitable press according to its instructions, or shake cold milk in an intact food-safe jar. These methods produce different textures, so choose one that suits the drink.
Should milk be hot or cold before frothing?
Both can work. Warm milk suits a hot latte; refrigerated milk suits cold foam. In this guide, the sealed-jar method is for cold milk only. Heating is not a universal requirement for creating bubbles.
Can I froth skim milk?
Yes. Skim milk can make a substantial amount of lighter foam. Whole milk provides a richer mouthfeel, but that does not mean skim milk is unsuitable. Choose based on the texture and flavor you prefer.
Does oat milk need to say “barista”?
Not necessarily. Some regular oat beverages will foam, although results vary. Barista formulations are a useful starting point when ordinary oat milk gives disappointing results. Check the individual product rather than assuming all oat milk behaves alike.
Can I microwave milk to warm it?
Yes, in an open microwave-safe vessel with enough headroom. Use short heating intervals, stir carefully between them, and check the temperature. Heating time depends on the quantity and microwave power. Never microwave a sealed container or a metal lid.
Will a handheld frother make latte art?
It may produce a pourable texture with practice, but it does not guarantee the fine, integrated foam needed for detailed latte art. A pleasant mouthfeel is a more useful first goal than a perfect pattern.
Can I froth the finished chai instead of milk?
It may develop surface bubbles, but it is not the same as separately foamed milk. The tea, sugar, spices, and proportion of milk change the result. Strain first and confirm that your equipment permits mixed beverages.
Bottom line: Start with a whisk for warm milk or a cold-milk jar for an iced topping. Keep the setup stable, avoid sealed hot liquids, measure milk before frothing, and prepare the chai base first. A good home latte needs balanced flavor and safe handling, not an expensive machine.